This short article is going to break down my inspiration, method, and reason for adding a post processing based on hit effect to the recent WolverineSoft Studio game DreamWillow.
One of the most important parts of game design and the polishing phase of game development is adding Juice. To make sure we’re on the same page, Juice is the idea of adding auditory, visual, or any other sort of feedback to make a game not only look better, but feel better to play. For an expanded break down on the topic of Juice I highly recommend watching the talk Juice it or Lose it by Martin Jonasson & Petri Purho.
Recently I came across a game called Totally Reliable Delivery Service that has an excellent example of Juice being used to add emphasis to the player crashing their vehicle. I wanted to recreate this effect, and I decided that it would fit well within the WolverineSoft Studio game DreamWillow to help add emphasis to the player being hit. To do this I first had to break the effect down and figure out what exactly its components are and what it adds to the player experience.
deconstruction


The effect is most noticeable in the first gif where the player is crashing their golf cart. Right at the point of no return when the golf cart crashes, time slows down, chromatic aberration is added to the camera, and I believe some bloom is brought in to brighten up the scene. This combination of effects works well to simulate the shock of getting in a crash and also adds a very obvious signifier to the event. I think this is extremely effective and in the second gif you can see that even without the slow motion the more subtle version of the effect is still valuable.
Recreation
Leading into recreating this effect I chose to not worry about the slow motion. This is due to it not being necessary for DreamWillow and I also don’t think it’s fundamental for this effect to work effectively. While it definitely adds a large amount of weight to the impact of the crash, the absence of it doesn’t take away the signifier of the player crashing their vehicle.
To create this effect I will be making use of Unity’s Post Processing Stack. For a quick break down, all you need is to attach a Post Processing Layer and Post Processing Volume component to your main camera, set the Post Processing Layer’s layer to be the same as the one your main camera is on, and lastly create a new Post Processing Profile. The profile is what knows which effects are being used and can be modified or swapped out at run time.
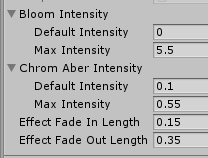
Here are all of the variables I found necessary to create this effect:
Default and Maximum Intensities for Bloom and Chromatic Aberration
I used Default instead of Minimum in case I want either of these effects to already be present on the camera.
Effect Fade In Length
Effect Fade Out Length
To get this effect programmed, Unity has a really handy function implemented for the specific use of adding and manipulating post processing effects dynamically without the need of actually editing the active Post Processing Profile. This function is:
public PostProcessVolume QuickVolume(int layer, float priority, params PostProcessEffectSettings[] settings);You simply tell QuickVolume() what layer to apply the post process effects to, the priority they have on the camera view, and what the effects are you want added as a parameter array.

QuickVolume being used in the on hit visual effect script that adds Chromatic Aberration and Bloom to post processing.
After figuring this out the next steps became pretty obvious, link a function call to an event that starts the effect and create a coroutine that performs the effect.
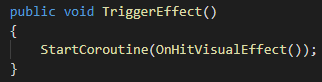
Public function called by Player.OnDamange() Event

The coroutine that performs the effect.
This coroutine is simply performing two back to back linear interpolations, first from the default to maximum effect intensity, and then back down from maximum to default. I think for such a small amount of work the visual feedback this offers is really powerful and adds a lot of emphasis to the player being hit.
