This short article goes over a map generation tool I created during the development of DreamWillow. I go over it’s capabilities, composition, purpose, and an example of its use.

DreamWillow is a game that I have been working on during the Fall 2019 semester of WolverineSoft Studio. It’s a top-down twin-stick shooter and leading into development we had aspirations to have procedurally generated levels. Some of the reasons for this was the idea that our design worked well as a rouge-lite experience, we thought it could cut down on the amount of iteration time level design would need to manually create levels, and we thought it would look good to have as an achievement for our development.
Ultimately we decided that hand made levels fit better with the scope of our work as well as the length of time we intend people to actually enjoy the game. Hand made levels allow us to create crafted experiences and have better control over the flow of challenge. While this means more work for the level design team we determined that a denser, shorter, and more controlled experience outweighs one that is shallower but longer. However, this work did lead to a very useful tool that allowed us to create shells of levels and to help alleviate level design writer’s block.
map generation Tool
The tool is built with two algorithms that are commonly used to create dungeons, the Drunkard’s Walk and Cellular Automata. These algorithms are great for creating widely varying shapes both organic and man made in appearance, and through editing of the algorithm’s variables the outcomes can become nearly endless. Here is a breakdown of the two algorithms that can be used within the tool.
Cellular Automata
Fill the map randomly based on a starting fill percentage
Smooth the map by applying a set of rules similar to Game of Life.
Repeat step 2 n times
Perform a filling algorithm to the smoothed map to find all unique rooms
Connect all disconnected rooms to nearest neighbor
Ensure all rooms are connected
Drunkard’s Walk
Pick a random starting point.
Place a floor tile at the current position
Randomly determine if the walker should spawn a new walker or die
Pick a random direction to move
Repeat steps 2-4 n times or until the map has filled to the set fill percentage.
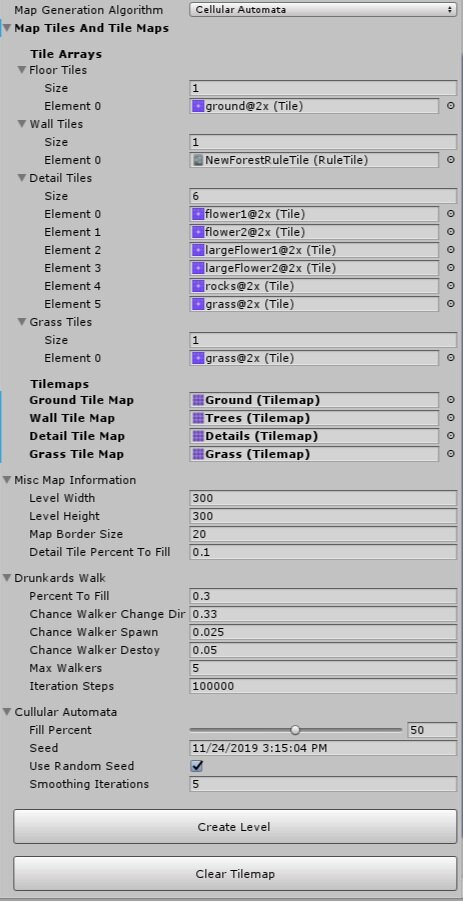
When it comes to interacting with the tool, the creation of maps is broken down into five sections:
Algorithm Selection
This is an enum that allows the user to select between Cellular Automata and Drunkard’s Walk.
Tile and Tile-maps
A class containing all of the needed tiles to create a map and the respective tiles maps they get placed on.
Miscellaneous Map Information
This includes map dimensions, the map border (the padding of the created map from the edge of the tile-map), and the percent chance a detail (flower, rock, grass, etc..) will get placed on a ground tile.
Drunkards Walk Modification Variables
Cellular Automata Modification Variables
As you can see at the bottom of the inspector window there are also two buttons added through Unity editor scripts to allows designers to create and clear maps within the editor.
Using the tool
One of the maps within DreamWillow I used the tool to assistant with its creation is the Hedge Maze. Since I’m using the tool to help with inspiration and alleviating writers blocks I found it best to have a strong idea of the level’s beats and overall theme before generating levels. The overall theme for the level is a hedge maze with the main beats being short introductory maze, combat arena, larger maze, final combat arena. The mazes make up most of this level and are filled with smaller skirmishes and branching path ways. I went in this direction because so much of combat in the previous levels is focused on larger arenas, and having a level focusing on map navigation could be a good way to mix up gameplay without abandoning its core.
Generated map
After a few minutes of creating and analyzing generated maps I finally decided on a shell to craft my experience around; the map is pictured to the right labeled before. I chose this one because I liked the shape of the bottom two rooms and the way the room I selected for the first arena connects to the two mazes. I also liked the vacant space in the top left that allows me to grow the larger maze into it. I also felt that the tip at the far top right is good place for the exit portal.
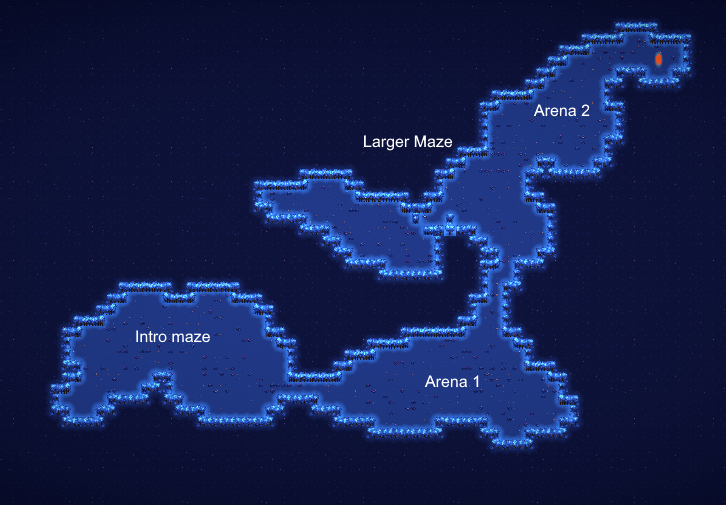
Before

After
After some editing on the shell to more closely fit what I’m looking for I came to my first iteration. Some of the changes include:
Shortening the connection between the Intro Maze and Arena 1
Rounding out Arena 1 and removing the area to it’s bottom right
Creating the Larger Maze area and editing Arena 1’s path into it
Increasing the size of Arena 2 to accommodate the change in shape of the second maze.

moving forward
Since the map generation tool’s primary purpose is to help getting started on the level creation process the bulk of this article is concluded. From here I went on to start fleshing out the interior of the level, creating encounters and setting up the maze. Since that work is out of the scope of this articles intended purpose I won’t touch on it but I will leave a final image to show the levels final iterated state.