This character controller is an continuation from work shown in this blog post. Here is a video of its current state:
My main motivation for creating this controller was to figure out what makes a great character controller stand above an average one. To start my research I read this thesis paper by Martin Fasterholdt and this series of articles by Yoann Pignole. By reading these I learned of the ways platformers commonly assist the player and make the controls feel more intuitive.
Wall stick
Jump Queue
Coyote Time
Varying Acceleration / Deceleration speeds
Better Jumping
Gravity determined by desired jump height
Varying jump height determined by input length
Varying gravity scales for jumping vs falling
sticky walls

Sticky walls is a player assistance technique that causes players to stick to walls they are on for a split second when they change movement away from the wall. This is beneficial for any character controller that offers wall jumping because it gives player padding so they can set their aim and then jump. Without this delay they would most often just fall off the wall when trying to jump off.
To implement this simply turn off gravity or pause the y velocity for a split second if the direction the player is trying to move is opposite of the wall they are currently sliding on.
Jump Queue

Imagine this scenario, the player is about to land on a platform that is only a few blocks wide, just large enough to stand on. They know they need to jump instantly, and unfortunately they press the input a split second to soon so the jump is not registered when they think it should have, so they slide off the platform and die. This feels terrible, and people will most likely (and rightfully) blame the game for this death because they know they hit the jump at the right time. Time for a Jump Queue.
The Jump Queue is really easy to implement. All you need to do it record when the player has hit the jump input, remember the input for a certain amount of time or frames (should only be used if the frame rate is constant), and if the player touches the ground within that time frame then instantly jump. This is a really easy addition to a character controller that makes a huge difference for player feeling.
coyote time

Coyote Time is another common player assistance technique that allows players to jump for a short amount of time after walking off a ledge. Similar to the Jump Queue, this technique improves player feeling and can help to reduce the frustration or mistiming jumps. Due to human nature and reaction times, it helps to give players a buffer that allows them to time jumps perfectly.
My implementation of Coyote works by simply keeping track of when we are on the ground and storing it for a single frame. If we see that we were on the ground last frame, but no longer on the ground for the current frame then we should consider applying Coyote time. The determine if the player has actually walked off a ledge though rather than just being thrown into the air or jumping, we also have to check that our player’s y velocity is less than zero.
Better Jumping
As you can tell by the three previous player assistance techniques above, most of the work in building a better platformer is based around making the jump feel good. In this section I’m going to talk about how we actually make that jump.
Adjustable Jump Height dependent gravity
Varying jump height determined by input length
Varying gravity scales for jumping and falling
Adjustable Jump Height dependent gravity
Lets first start by figuring out how we want this jump to behave. You might think a good solution to this would be to just apply a force to the player until they responded in a way that feels good, but there is a more objective solution to this. Given a desired Jump Height and Time to the Jump Apex, we can determine what the gravity should be as well as the force applied to the player is.
Given the kinematic formulas Δx = (v0 * t) + (1 / 2)(a * t^2) and v = v0 + at, our known variables, and the situation of starting from our jump height and accelerating downward we can find the value for gravity; v0 is initial velocity. Using these formulas and our known variables lets find gravity and our jump velocity:
Δx = (v0 * t) + (1 / 2)(a * t^2)
jumpHeight = (1 / 2) (gravity * timeToJumpApex^2) ; we can ignore (v0 * t) since we will be starting from the jump apex which means we will have a velocity of zero.
(2 * jumpHeight) = (gravity * timeToJumpApex^2)
(2 * jumpHeight) / ( timeToJumpApex^2) = gravity ; and now we know gravity!
Now that we know gravity lets find the jump velocity:
v = v0 + at
jumpVelocity = (gravity * timeToJumpApex) ; again we can ignore (v0 * t) since we will be starting from the jump apex which means we will have a velocity of zero.
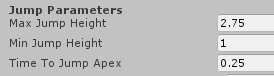
And now we know both our gravity and our jump velocity! Given that we apply our gravity appropriately on every frame, our jumps should now last the length of time that we set timeToJumpApex to and go as high as our given jumpHeight. Here is the code and the Unity inspector variables:

* Ignore min jump height for now, we will get to it later.
Varying jump height determined by input length
Another jump convention within many platformers is to have the player have a minimum and maximum jump height, with the actual height the player reaches dependent on how long they hold the input. First off lets implement a minimum jump height. For this we will need to know the minimum jump velocity, thankfully there is another kinematic formula to help us; same idea as before, we will use gravity for acceleration:
v^2 = v0^2 + 2 * a * Δx
minJumpVelocity^2 = 2 * gravity * minJumpHeight ; we can ignore (v0^2) because our starting position will be at the minJumpHeight apex
minJumpVelocity = Sqrt(2 * gravity * minJumpHeight)
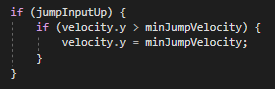
You can see the code above for finding the minJumpVelocity. Now how do we make use of this? Well it’s very simple, all we need to do is see when the player releases the jump input, and if their velocity is greater than minJumpVelocity (which it will since velocity gets set to maxJumpVelocity initially) we set their velocity to minJumpVelocity. With this implemented, if the player taps the jump input they will raise to the minJumpHeight, if they hold it for the length of ~timeToJumpApex they will climb to maxJumpHeight, and if they release the input anywhere in between they will raise to somewhere between the min and max jump height.
varying gravity scales for jumping and falling
Used within games like Mario all the way to Celeste I want to address the another common technique that is used to give jumps a sense of weight. By increasing gravity as the player is descending the character will appear heavier and it makes the initial jump seem more powerful. Thankfully this is another quick addition to the algorithm, simply increase gravity once the player has hit the apex of their jump and begins descending (velocity.y < 0).

conclusion
The player experience should always be the highest priory for every developer, and one way to insure this in platformers is to create great feeling and intuitive controls. Outlined in Steve Swink’s Game Feel:
If the thing a player is controlling does what they want and expect, accurately translating their impulses into the game, then the controls are intuitive. … The control over an avatar feels like an extension of the player’s body. … Unintuitive games are not challenging (making the game difficult in the dimension of skill), they interfere with the player’s ability to play the game through interference. … As long as the result of an action is predictable, the goals clear and the feedback immediate, it will fall on the scale of challenge. If not, it’s interference, noise in the channel between the player’s intent and the game’s reality.
By incorporating player assistance mechanics, greater feeling controllers, and polish, we are able to minimize the amount of interference in a player’s way while playing our games, and in turn improve the overall player experience.